Thank you for all the love. Based on the feedback of our community we have updated the latest [May 2024] flow for booking.
Hello, spiritual travelers! Interested in experiencing a hassle free and time saving darshan at the esteemed Ram Mandir in Ayodhya? You’ve come to the right place! This guide is designed to help you navigate through the booking process with ease.
How to avoid long queues at Ram Mandir in Ayodhya?
Follow this guide and pre-book your Darshan time through official website.
Remember booking for slots now open 15 days in advance at 12 midnight. There are 150 slots for every 2 hour slot starting from 7AM-9AM to 7PM-9 PM. The darshan is not available between 11AM to 1PM. (latest update May 2024)
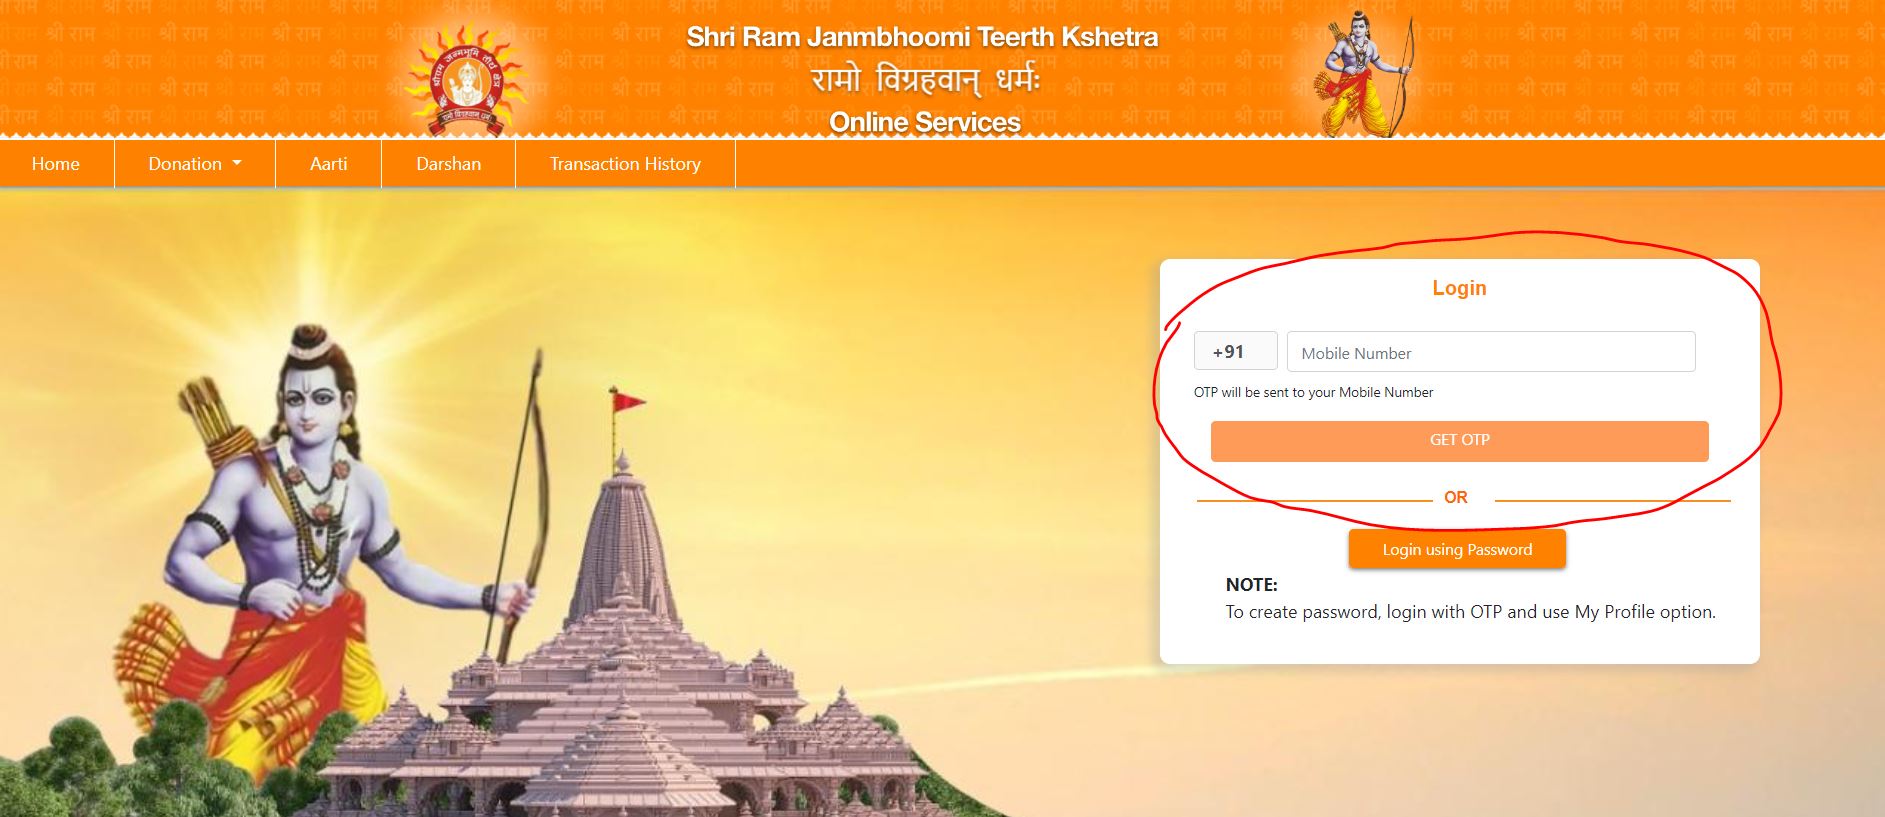
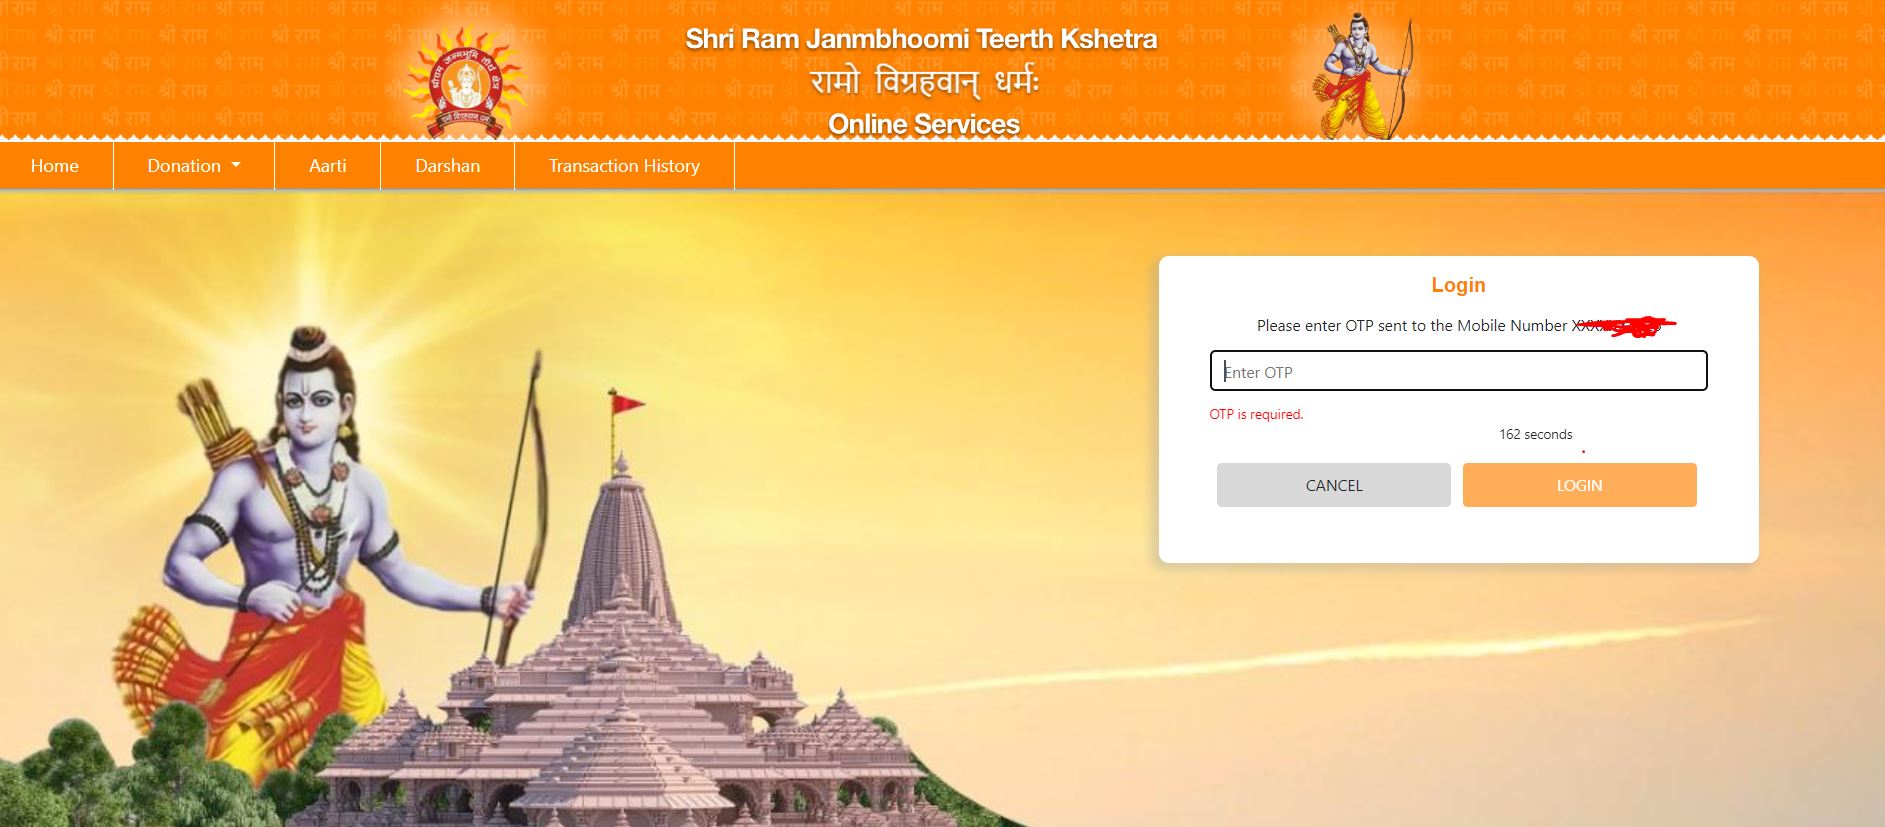
1. Starting Your Journey: Logging In
First things first, let’s get you logged in. Head over to the official booking portal at Ram Mandir Aarti Booking. New users must create an account. Existing users can log in with their credentials.
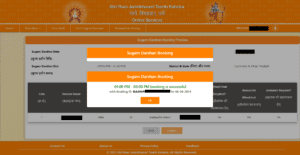
Ram Mandir Darshan Booking
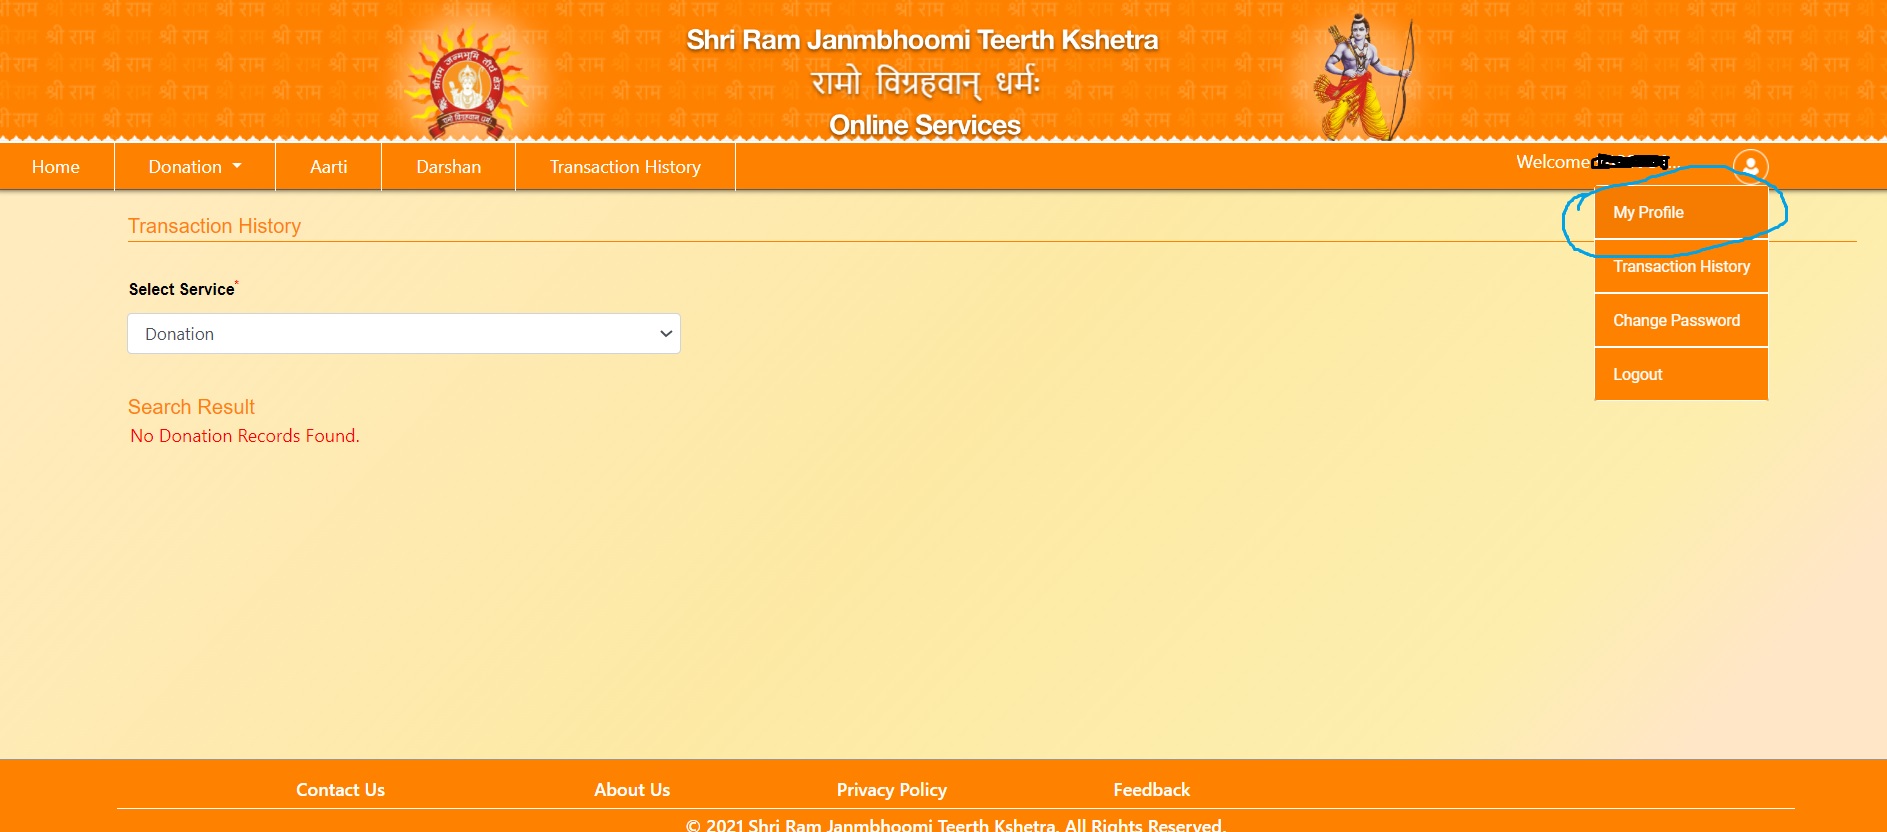
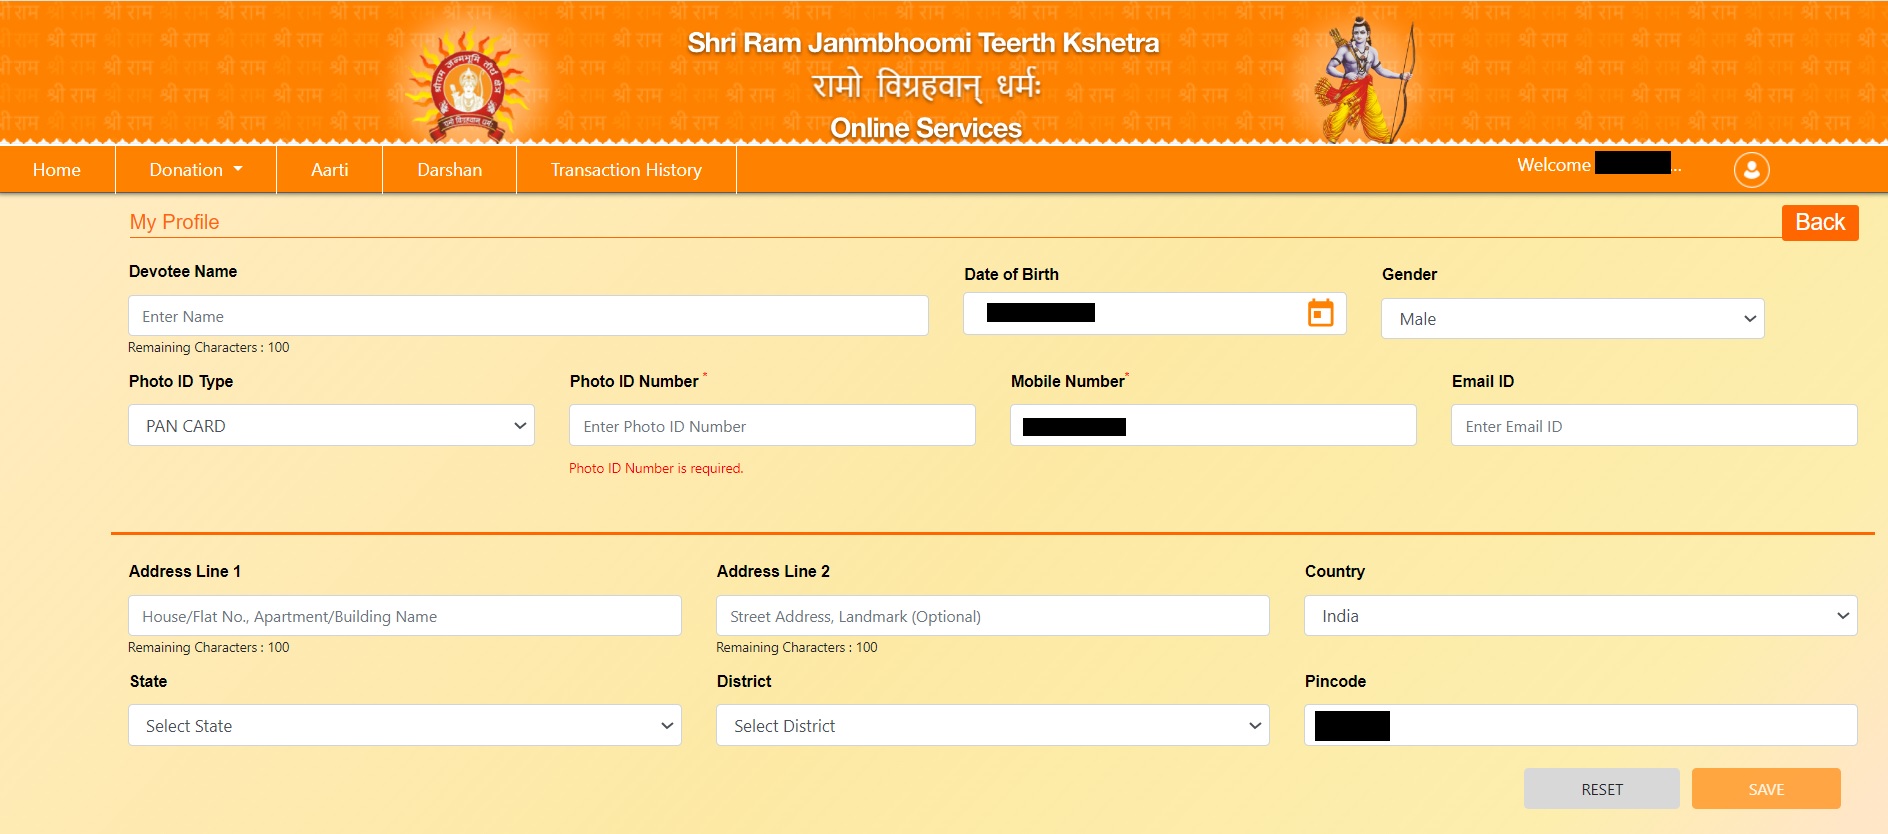
2. Setting the Foundation: Updating Your Profile
Before you dive into booking, make sure your profile is up to date. Why, you ask? Well, having your details filled in saves precious time during the booking process. Ensure your profile has your current personal information. This step is crucial for a faster booking process.
3. The Golden Hour: Booking Time
- Be Prepared: Booking opens 15 days in advance at midnight. Slots are in high demand, especially on weekends.
- Devotee Limit: You can book for up to 8 devotees per account.
Here’s where you need to be quick! Aarti slots open at midnight and are known to fill up quickly for holidays or rush weekends.
darshan booking form for ram mandir
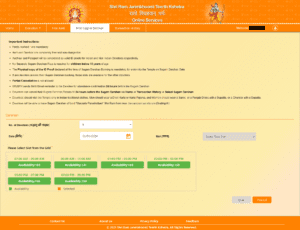
4. The Booking Process: Securing Your Slot
Now, let’s get to the exciting part – booking your Aarti slot!
- Prep Work: Be logged in to the portal just before midnight. Get your fingers ready to refresh the page.
- Midnight Action: As soon as the clock strikes 12 midnight, hit that refresh button. No time to waste!
- Slot Selection: You’ll see green slots indicating availability. Choose one that suits you. Select the date and slot
- Number of devotees: Next, select the number of males, female and children in the group
- Quick Tip: There’s an option to confirm that your ‘Devotee details and Address are the same as in My Profile.’ Tick this if your profile is complete (remember step 2?). Remember only the main member’s profile will get filled up. for other members, you’ll still need to fill out all the details
darshan form at ram mandir
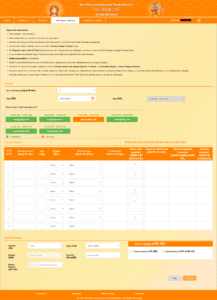
5. Finalizing Your Booking: ID and Photo Upload
Almost there! Now, fill in your ID details (copy your ID details before booking begins) and upload a photo. You have two options for the photo:
- Photo Capture: Take a live photo using your phone or laptop camera.
- Upload Photo: Ensure it’s in jpeg, png, or jpg format and less than 1 MB.
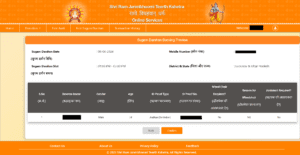
6. The Last Step: Confirmation
Once you’ve filled out the form, click ‘Proceed’ to complete your booking. A review page will open up. Quickly verify details and click on ‘Confirm’
review-page-for-ram-mandir-darshan
Voila! Your Darshan experience is now booked. You can visit the transaction history to confirm the booking or to download the pass.
downloading-pass-for-ram-mandir-darshan
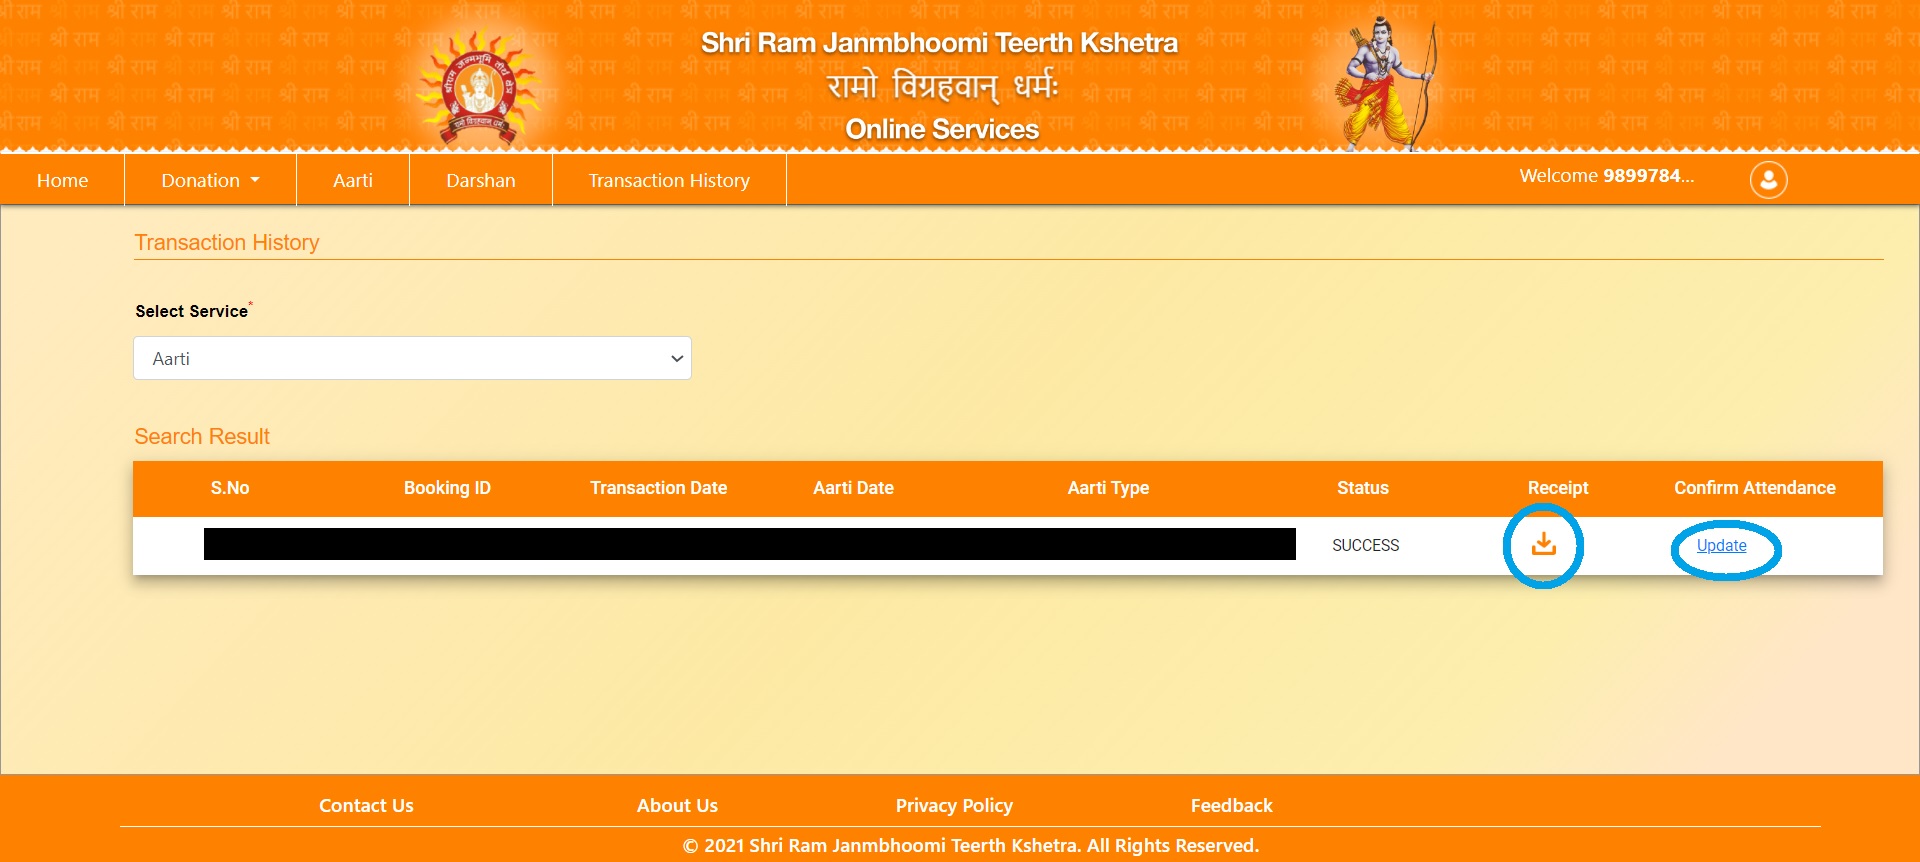
attendance-confirm-for-ram-mandir-darshan
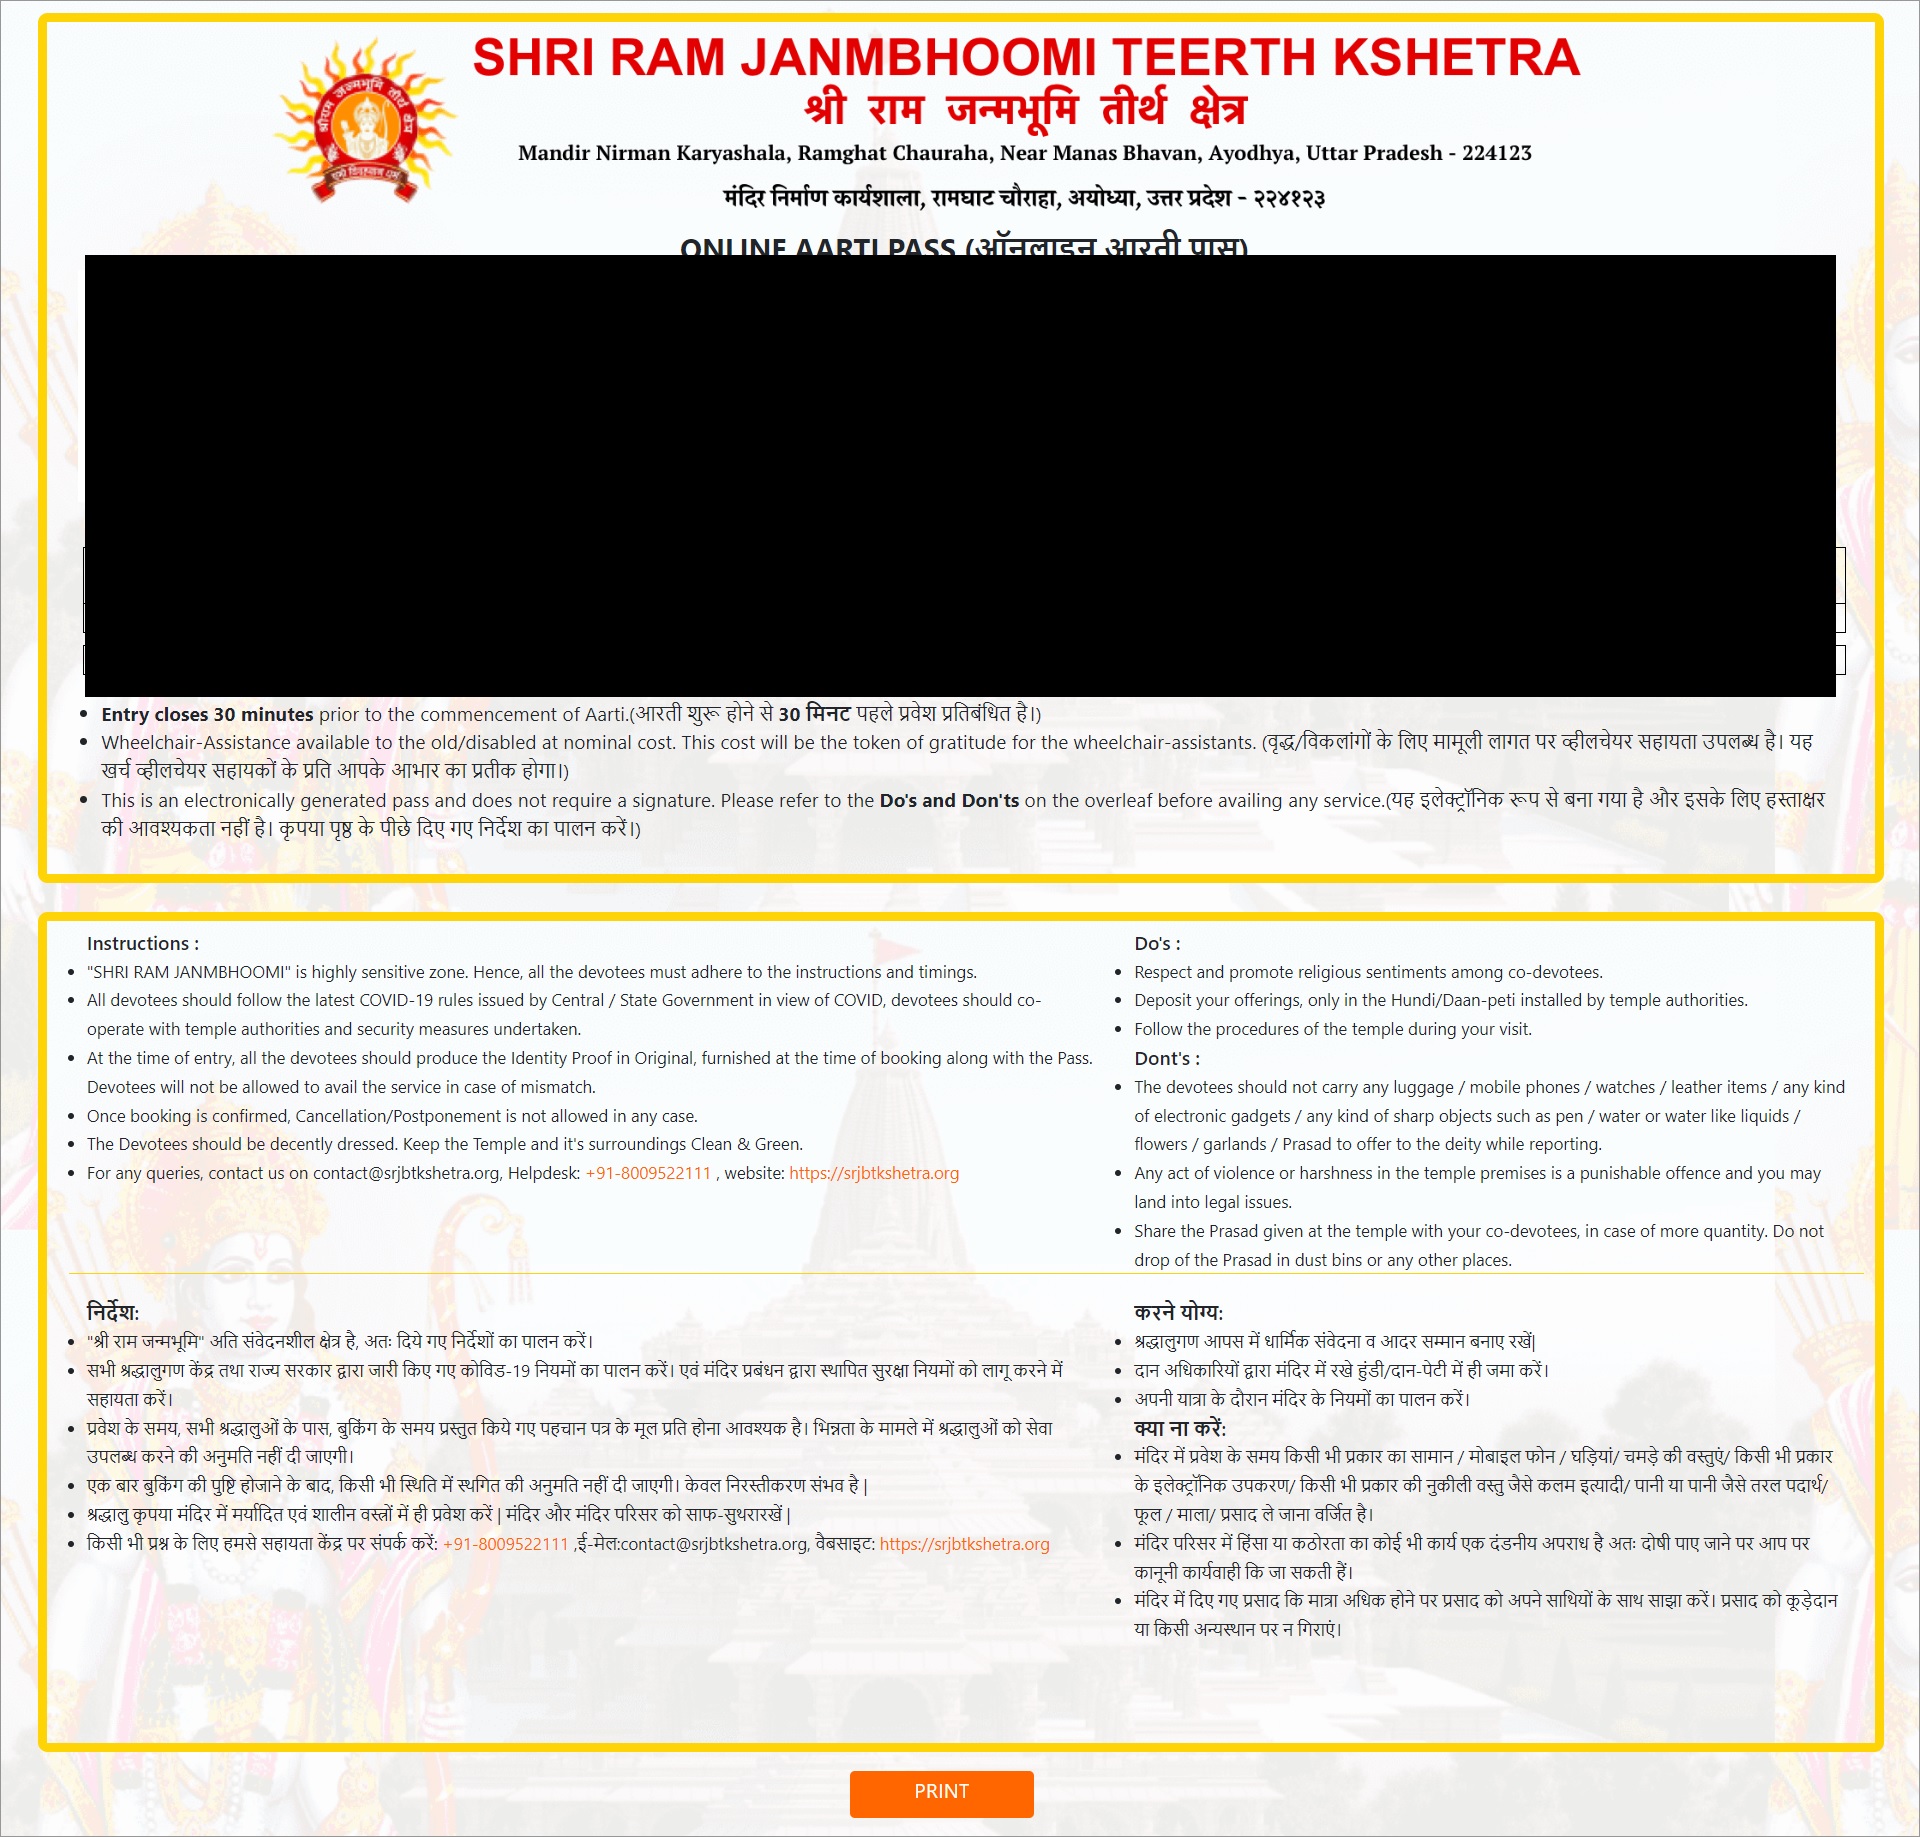
darshan-pass-for-ram-mandir
7. Reminder and Attendance Confirmation
- Stay Alert: Watch for an SMS or email reminder 24 hours before the Aarti.
- Confirm Attendance: Use the link provided in the reminder to confirm attendance. You can also confirm via the transaction history section 24 hours before the visit. Note: The confirmation link expires 1 hour before the allotted time.
*Very Imp* Keep an eye on your SMS or email. You’ll receive a reminder 24 hours before the Aarti. Make sure to confirm your attendance through the provided link or else the booking will be cancelled automatically! (You can visit the transaction history section 24 hours before the visit to confirm the booking too). The confirmation link expires 1 hour before the allotted time.
8. The D-Day: Collecting Your Pass
Bring Essentials: On the day of Darshan, bring your pass and ID. Check for any updates on the booking site. If there are recent updates we will post here too.
There you have it! A step-by-step guide to booking your Darshan at Ram Mandir, Ayodhya. May your spiritual journey be as smooth as your booking process. Happy travels! 🙏🏼✨


Thanks for putting this up. Really helpfull.
thank you Shruti! glad you liked it.
I think the website is now updated can u put up the latest screenshots and flow?
Thank you. We will update this promptly
https://srjbtkshetra.org/ is broken and does not work any more.
It is working now. They keep making changes and we try our best to update the blog with latest info. As of posting this comment the online booking is working as per flow given.
For ID proof…is physical photo copy of original accepted ?
It is better to carry physical copy. A digital or print of Aadhar will work as well. But any other photocopy they will not allow.
Thank you for the valuable advice.
Can you please advice how can NRI’s book for aarti or darshan from overseas as we do not have a Indian mobile number to receive OTPs.
Hi Jaiprakash!
This is a problem faced by many NRI visitors, most of our readers have told us that they booked via an agent or sometimes their hotel helped them out. Even if you are staying in Lucknow, hotels are helping arrange VIP darshans. None of this is official information and you must take due precautions. We will try to connect to some good travel agents and put their details here soon.
Thanks
For NRI to book please select the email login option ( just beneath the mobile no field) An OTP will be sent immediately to your email account to enable you to proceed with the booking . I am based UK and have managed to login without any hassle ( do try a couple of times if screen returns an error especially first time) . Good luck.
Can we do darshan booking on site ?
What documents are required for offline booking ?
If the slots are available then the camp office may allow offline aarti/darshan booking however this is very unlikely and the security may deny access to camp office without prior booking. Document required is just a valid Govt ID proof. The security is very moody and depending on the crowd on given day they change rules/behavior. Generally you can visit without darshan booking in the common queue if you dont have the booking.
Jai Hind
Info is bit confusing
1.darshan slot booking as per site statrs 03daysinadvance.
2 it says max no of devotees in single booking is 5.
3.kindly confirm
Thanks
SK GUPTA
Thank you for bringing this to our notice. We have corrected this. The latest info was updated at the top of the article but same was missed inside the article.
Bookings start 15 days in advance and upto 8 people can book in 1 go.
I think these information should b available in hindi also because it’s all about sanatan dharm and many old age people can not understand.
Hi Richa! Yes, we absolutely agree. Most of our pages are being translatable by google. Few pages we have also created in Hindi. Slowly slowly we are creating hindi pages of all our content. Thank you for supporting us.
can i get Sugam darshan pass offline as no slot available
Hi!
It is not possible. As per our knowledge there is no separate quota for offline.
राम दर्शन के लिये दर्शन pass बिना नही जा sakte क्या
Ja sakte hain
Hi
I went through the process of booking as soon as the slot opened. I was able to complete the booking for Sugam Darshan but for a small glitch. I wanted wheel chair facility for my mother who is 80+. Tried 3 to 4 times including her Aadhar card details as proof, but I was not able to book the Darshan with this, but when I removed the request for wheelchair then it went through and got confirmation.
Now, please can you assist me how to edit the booking to include wheelchair facility for my mother.
Look forward to hearing from you.
Jai Shri Ram,
Can we get sugam darshan without pass?.
we heard that Ram mandir management expects one lakh people visits every day. but darshan slots are very less/limited. then how others can visit for darshan if slots are not available.?
official website and other websites saying no pass is required for darshan.
we Have a lot of confusion. Please clarify.
Hi Keshav!
Yes, visit is possible without pass. Unreserved entry is very crowded generally and lengthy queues are high possibilities in the morning.
if a villager, illetrate, farmer or simple man who don’t know all about this lengthy procedure how he can do the Darshan. Please guide.
They can ask for assistance from nearest computer cafe or can go directly and join the unreserved queue
Is it possible to book Aarti and separate darshan slot for the same day?
Yes, it is!